


Hach ja, seit der Entdeckung von Latex Milch bin ich viel motivierter Watermarbling, Gradients und die ganzen mühsam aufzuräumenden Techniken zum Einsatz zu bringen. Ich liebeliebeliebe Gradient Nails und was ist schon besser als ein Gradient? - Richtig. Zwei Gradients! Und weil's farblich so schön zur Mädchenzeit passt, gibt's daraus wieder mal einen Beitrag für die Aktion.


Die Technik ist nichts Neues, schon zig Mal auf Instagram und anderen Blogs gesehen, aber wer sie jetzt so richtig erfunden hat, kann ich auch nicht wirklich sagen... Jedenfalls nicht ich, das steht fest.
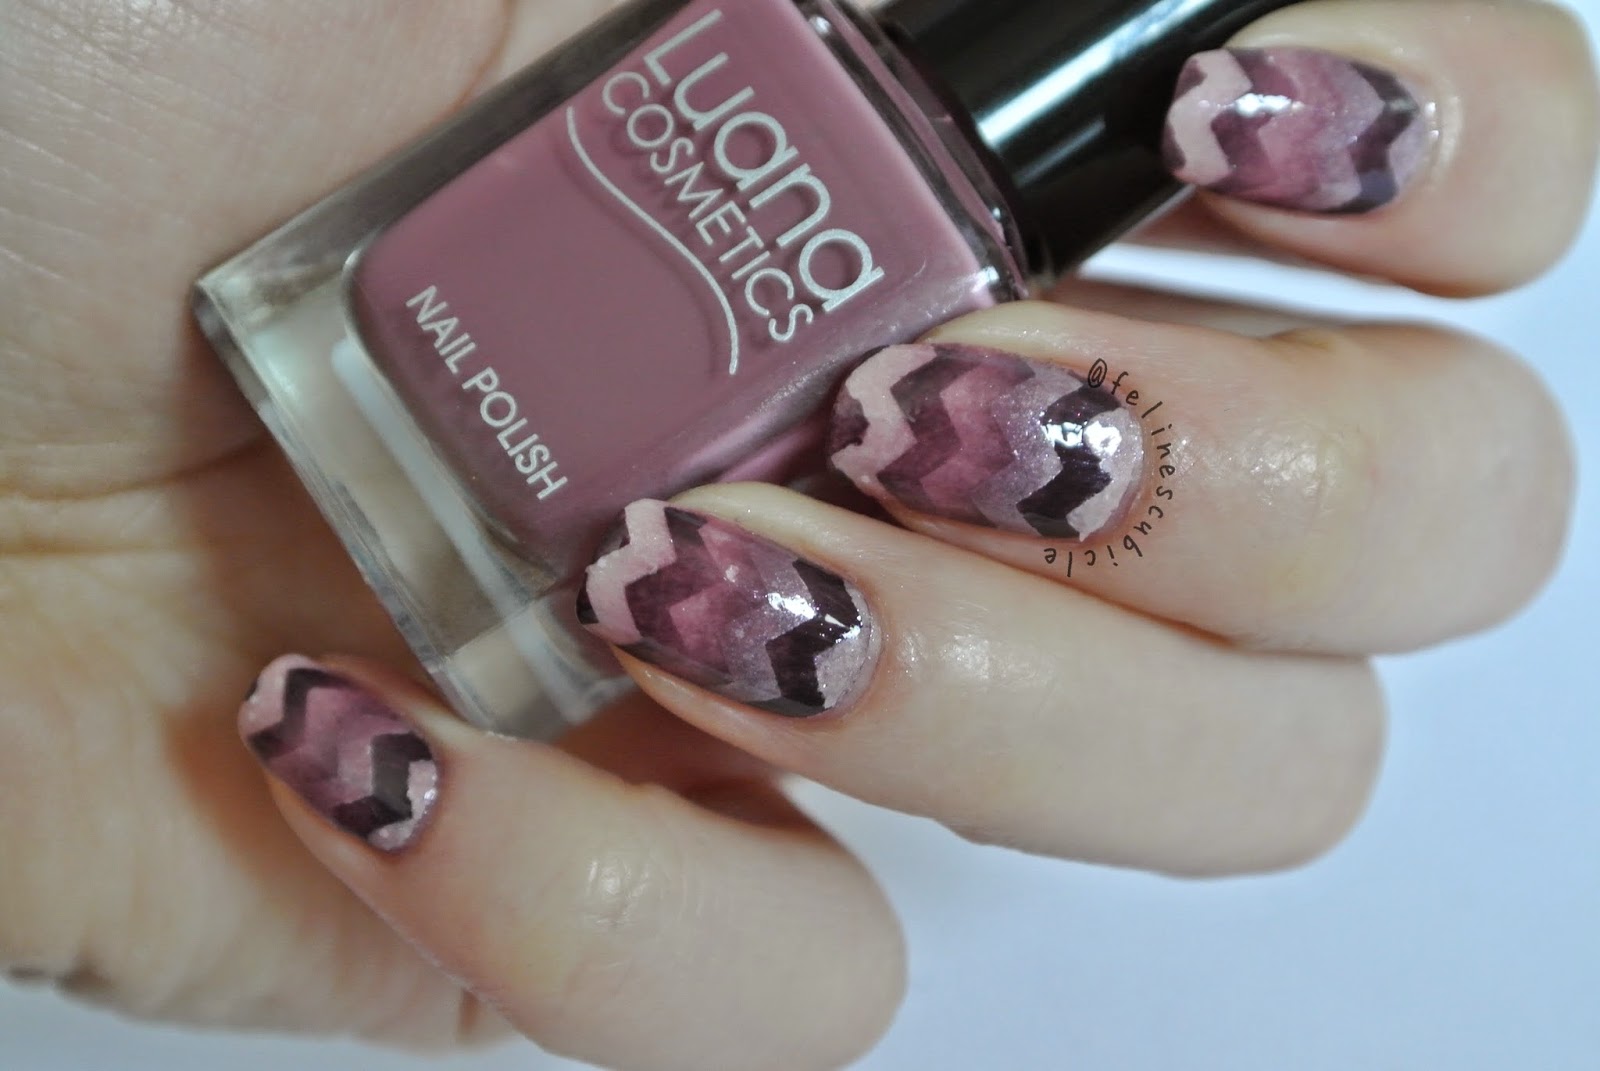
Eigentlich ist sie auch ganz einfach, benötigt halt etwas Aufwand. Ich habe mit einem stinknormalem Gradient angefangen, wobei ich von der Nagelhaut zur Spitze heller geworden bin. Spielt aber eigentlich gar keine Rolle... Anschliessend gut durch trocknen lassen oder einen Schnelltrockner verwenden (wie in meinem Fall mit Sally Hansen's Insta-Dri). Dann kommt der knobeligste Schritt, wobei es sich aber lohnt, wenn ihr euch Zeit nehmt und die Vinyls in schön gleichmässigen Abständen aufklebt! Dann nochmals das selbe Gradient darüber, diesmal aber umgekehrt, also bei mir von der Nagelhaut mit dem hellsten Ton beginnend. Vinyls abziehen und fertig!
This technique is nothing new, I've seen it a couple times across Instagram and other blogs, but it slips my mind who came up with this... Wasn't me, that's for sure.
It's really simple to do, just takes up a lot of time. I started off with a normal gradient, with the darkest colour at my cuticle area blending towards the lightest shade at my tips. But it doesn't really matter which way you run your gradient... I then sealed it with a quick drying top coat (Sally Hansen's Insta-Dri in my case), optionally you could just let it dry reeeally well. Followed by the most time consuming step, in my opinion: Applying the nail vinyls. You will want to take your time and space them nicely. Finally add the same gradient as you started off with, but this time reverse the colours. I did the lightest shade at my cuticle this time. Remove the vinyls and done!

Verwendet habe ich eine Schicht Cosy Home von P2 und für das Gradient denselben Ton plus Couture von Luana Cosmetics und Romantic Dinner, ebenfalls von P2. Meine Vinyls habe ich mir bei nailvinyls.com bestellt, aber die gibt es inzwischen von ganz vielen verschiedenen Anbietern!
I used one coat of Cosy Home by P2 as my base and for the gradient I combined it with Couture by Luana Cosmetics and Romantic Dinner, also by P2. My nail vinyls are from nailvinyls.com, but there's lots of online shops offering them now!


Sieht echt klasse aus! Die Technik sieht immer nach mehr Aufwand aus, als sie eigentlich mit sich bringt. Auch wenns rumsaut und ein bisschen dauert, Gradients sind ja jetzt nicht das schwierigste. Schön dass es auch mal tolle Effekte gibt, die eher einfach zu erreichen sind! :D
AntwortenLöschenDein Titel gefällt mir hier übrigens sehr :P
Danke! :) Der einzige Aufwand ist der zeitliche, dauert halt ein Momentchen bis man alles schön abgeklebt hat... :D
LöschenOhh wie schöööön! Das ist aber toll geworden. Sehr hübsch und tolle Farbauswahl (wobei ich sie eher herbstlich finde) :)
AntwortenLöschenDa gebe ich dir Recht, ich habe noch etwas Mühe saisongerechte Farben zu tragen, jetzt im Moment herrscht Sommer auf meinen Nägeln ;)
Löschen